The online LIMS*Nucleus demo at demo.labsolns.com was shut down in April 2024.
Contact mbcladwell@stihie.net for demo options.
The online LIMS*Nucleus demo at demo.labsolns.com was shut down in April 2024.
Contact mbcladwell@stihie.net for demo options.
Click the ‘Projects’ hyperlink on the global navigation pane. Navigate into the project that will contain the plate set. Note that the ‘Plate Set For…’ link now indicates the default working project.
Select the check box near the plate set into which you would like to add a new plate set. Click the tools icon and select add to project…

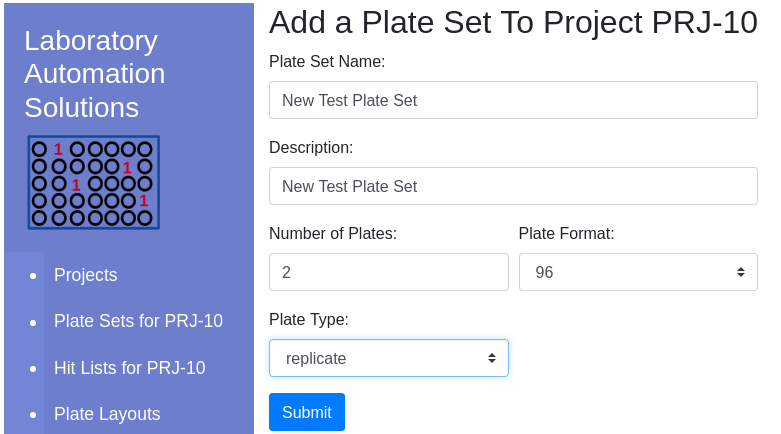
| Item | Notes |
|---|---|
| Type | Choose a descriptive type that can later be used for sorting |
| Layout | Check the Layout viewer to learn about the different layout options |
Available layouts are presented in the dropdown appropriate to the plate format/type:
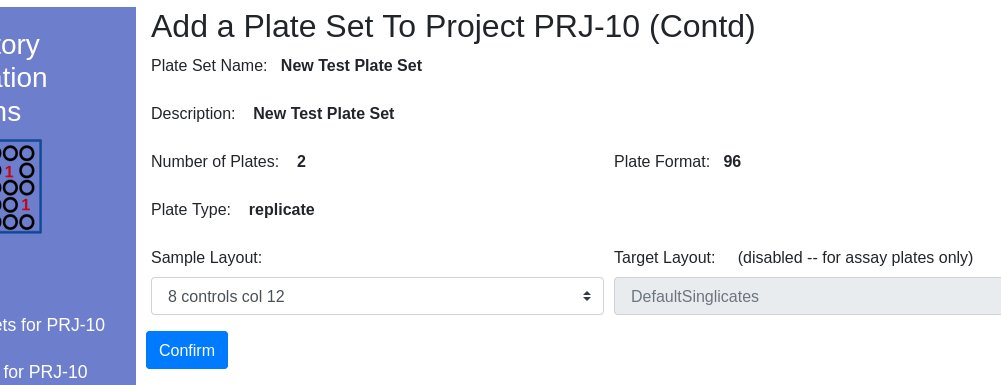
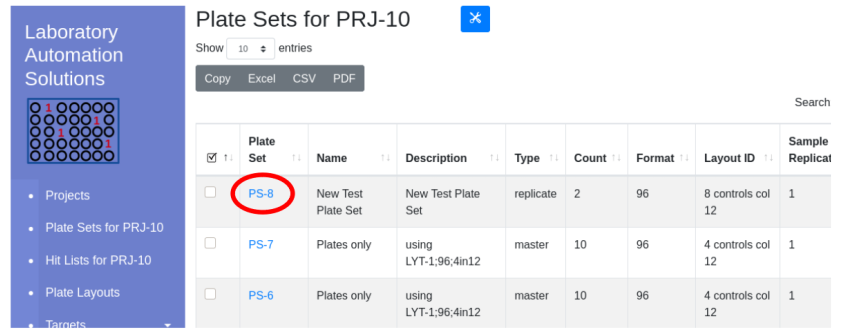
Once complete, the new plate set will be visible in the client window.
LIMS*Nucleus defines a hierarchy of 5 entities.
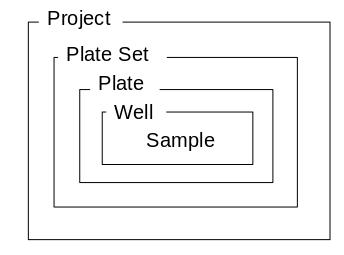
A project contains plate sets, each of which contains plates etc.
Projects can only be created by an administrator. Plate Sets can be
created by users. Other entities are created automatically as needed.
Plates, wells, samples are created at the time of plate set
creation.
Plates and wells are created automatically during rearraying
operations.
LIMS*Nucleus example database contains plate sets, plates, hit list, assay runs and data. The various projects are at different stages of completion to demonstrate the functionality of the application.
| Project ID | Description | Utility |
|---|---|---|
| PRJ-1 | 3 plate sets with 2 96 well plates each; includes data and hit lists | visualize data; visualize hit lists; group plate sets; |
| PRJ-2 | 1 plate set with 2 384 well plates each; includes data | create hit lists |
| PRJ-3 | 1 plate set with 1 1536 well plate | visualize data |
| PRJ-10 | 2 plate sets with 10 96 well plates each | add data;create hit lists; subselect plate sets |
### Files for import
Provide your own import files or use the supplied data below:
| Description | File |
|---|---|
| Accession IDSs for PS-1 ( 2 96 well plates, 4 controls) | accs96x2controls4.txt |
| ELISA data for 2 96 well plates with 4 controls col 12 (LYT-1) | sample96controls4lowp2.txt |
| HTRF data for 5 96 well plates with 8 controls col 12 (LYT-7) | sample96controls8low5plates.txt |
| A new 384 well layout with controls randomly placed | controls8scatteredNoEdge384.txt |
| Assay Run | File | Response | mean(neg) | stdev(neg) | neg + 3SD |
|---|---|---|---|---|---|
| AR-1 | ar1data.txt | raw | 0.1155 | 0.07 | 0.3255 |
| bkgrnd_sub | 0.1146 | 0.0697 | 0.3236 | ||
| norm | 0.1807 | 0.1172 | 0.5322 | ||
| norm_pos | 0.1971 | 0.1236 | 0.568 | ||
| % enhanced | NA | 0 | NA | ||
| AR-2 | ar2data.txt | raw | 0.0945 | 0.0332 | 0.1942 |
| bkgrnd_sub | 0.0922 | 0.0357 | 0.1993 | ||
| norm | 0.1381 | 0.0601 | 0.3184 | ||
| norm_pos | 0.1641 | 0.0703 | 0.3751 | ||
| % enhanced | NA | NA | NA | ||
| AR-3 | ar3data.txt | raw | 2850 | 2616.2951 | 10698.8853 |
| bkgrnd_sub | 2849.9978 | 2616.2935 | 10698.8781 | ||
| norm | 0.1102 | 0.1076 | 0.4331 | ||
| norm_pos | 0.1184 | 0.1095 | 0.4469 | ||
| % enhanced | NA | NA | NA | ||
| AR-4 | ar4data.txt | raw | 0.109 | 0.066 | 0.3069 |
| bkgrnd_sub | 0.1076 | 0.066 | 0.3057 | ||
| norm | 0.1513 | 0.0956 | 0.438 | ||
| norm_pos | 0.1906 | 0.1168 | 0.5411 | ||
| % enhanced | NA | NA | NA | ||
| AR-5 | ar5data.txt | raw | 0.0764 | 0.0512 | 0.23 |
| bkgrnd_sub | 0.0728 | 0.0512 | 0.2265 | ||
| norm | 0.0895 | 0.0629 | 0.2783 | ||
| norm_pos | 0.1259 | 0.0885 | 0.3914 | ||
| % enhanced | NA | NA | NA |
1 | sudo mkdir /sys/fs/cgroup/systemd |
LIMS*Nucleus falls into the “systems” category of LIMS development. LIMS*Nucleus contains a limited set of features and is designed to be integrated into a larger system.
Comprehensive but limitted feature set (multi-well plate sample management) with well defined inputs and outputs designed to be incorporated into a larger system.
Create project, plate set, plates, wells with and without samples
Group plate sets into a new plate set
Subset plates from a plate set
into a new plate set
Reformat plates from 96 into 384 well plates
and 384 into 1536 well plates
Apply assay data to plate sets
Visually or algoritnmlically evaluate assay data
Identify hits as
samples surpassing a threshold; create hit lists
Create worklists
for liquid handling robots
Rearray hits from a hit list into a new
plate set
Apply user generated barcodes to plates
Apply user
generated accession IDs to samples
Multiple workflows use a file import form show below. Text provides instructions as well as an example of what the contents of the file should look like. Import files are always tab delimitted plain text. Column order, spelling and capitalization are critical:

Post file selection trucated contents of the import file are displayed for confirmation prior to submission. If file contents are determined to be incompatible with requirements for a particlar import e.g. wrong number of rows/columns, incorrect header, a warning will be issued:

Tab delimitted ASCII text Header required Column names must be all lower case Column name spelling is critical Column order is critical
Plate order is defined by the plate set. Import plates must be in the same order as the plate set
1 | plate well response |
1 | plate well accs.id |
1 | plate barcode.id |
1 | project target description accession |
Only plate sets can be grouped. Navigate into the project of interest containing the plate sets to be grouped and highlight the plate sets. Select Utilities/Group from the menu bar:
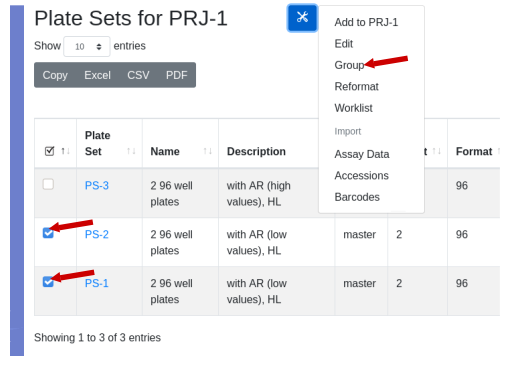
A dialog will open. Fill in the name and description for the new plate sets. The source plate sets must be of the same format and layout, which will be indicated in the dialog box. Select a plate type and press OK.

View the channels video for details on how to set up a Guix channel.
labsolns can be installed as a Guix
channel. To do so, add it to
~/.config/guix/channels.scm:
1 | (cons* (channel |
Then run guix pull.
If you receive error messages like “…commit nnnn is not a descendant of nnnnn …” use
guix pull –allow-downgrades.